- 13 Sep 2024
- Print
- DarkLight
- PDF
Adding Users
- Updated on 13 Sep 2024
- Print
- DarkLight
- PDF
You can add additional users to your GRIN account from your Account Settings with customized user permissions.
What You'll Need
- Admin permissions
How to Do It
- Navigate to Account > Settings > Users. This will open a page with your Users table.
- Select + Add User. This will open the Add User modal.

- Enter your new user’s email address. They’ll receive an invite to join your GRIN account at that address.
- Select your new user’s role. Each role has different permissions, which you can learn more about in detail with our help article. Currently, the following roles are available:
- Admin
- User
- Finance Admin
.png)
- Select your new user’s team.
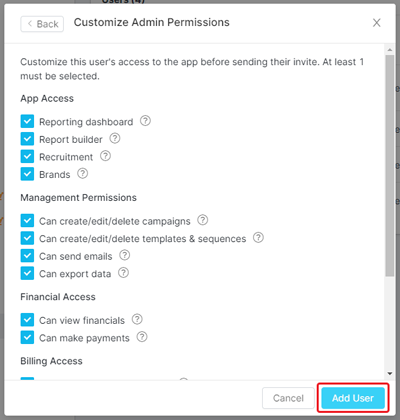
- Select Next. This will open the Customize Permissions modal.

- Select the checkbox next to any permissions you want to enable for your new user. For more information on user permissions, see our help article.
- Select Add User.

Once you’ve selected Add User, you will see a notification that says an invitation to join your GRIN team has been emailed to your new user. Your new user’s email should also appear in your Users table with an Invited status. The table will also show the user’s User Role, Team(s), and additional Actions.
There are specific actions you can take with new users that have been invited to your GRIN account, but have not used the invite link to join your GRIN team. They are:
- Resend Invite: Select this to email another invitation link to your new user. Sending a new link will automatically disable any previous invite links sent to the user.

- Cancel: Select this to open a popup and confirm you want to cancel your invitation to that user. Canceling will disable the invitation link emailed to that user.

Once your new user opens the invitation link in their email, they’ll need to complete GRIN's onboarding process. After they’ve finished, they’ll have all the access and permissions you specified when you added them.

