- 15 Nov 2024
- Print
- DarkLight
- PDF
Creating an Activation
- Updated on 15 Nov 2024
- Print
- DarkLight
- PDF
Activations is where you’ll manage your creator marketing strategy within GRIN and also customize each Activation for your brand’s needs. Whether you’re working with many creators or individuals, maintaining contracts and organic relationships, or tracking paid or unpaid tasks, you can manage all of it from Activations from start to finish. You can learn more with our article on Activations. You can learn how to create an Activation with the steps below.
Quick Navigation
What You'll Need
- An existing brand in GRIN you want to create an Activation for.
- Depending on the features and settings you want to include in your Activation, you may also need:
- Brand assets such as designs, briefs, or other assets you want your creators to have.
- An existing team in GRIN.
- An existing discount code group and/or affiliate link group.
- An integrated Ecommerce store with your brand.
- An integration with TikTok for Business to set up Paid Amplification.
- Custom questions for your creators set up for their Live Sites.
Video Walkthrough
You can use this video to learn how to create an activation or follow the steps in this article below!
How to Do It
- Navigate to Program > Activation.
- Select + Create Activation.
- Select your Goal for the Activation. If you aren't sure of your goals right now, select any of the options to proceed. Your choice won't affect how you can customize an Activation.
- Select the type of Activationyou’d like to create. GRIN provides a few options you can choose from depending on your needs:
- Send Products: A premade Activation template where you send creators your products and track content they create with them. This template comes with the Basic Details,Tracking & Deliverables, and Products settings, but you can add more settings if you need them.
- Track Conversions: A premade Activation template where you send creators your products with discount codes or affiliate links to promote to their audiences. This Activation is set up to track sales and conversions from creators. The template comes with the Basic Details,Tracking & Deliverables,Products,Conversion Tracking,Payments,Brand Assets, and Content Rights settings, but you can add more settings if you need them.
- Custom Activation: An Activation where you choose which settings will be included, such as conversion tracking, creator payments, and content rights.
Once you create an Activation, you'll be redirected to the Activation Settings page, where you'll configure all the settings you selected in Step 3. There are also a few tools you can use to help you customize your Activation. Select the arrow in the top right corner to open a slide-out panel. This panel has two menus:
- Preview: Displays a preview of how your current module will look to creators on their Live Sites. You can also interact with the preview if you want to test out any settings you configure. To get the latest preview, select the Save button to update your Activation's settings.
- Modules: Displays a list of available settings you can include in your Activation. Toggle the sliders next to each setting to add or remove their modules from your Activation Settings.
Basic Details
Each Activation has default, basic settings that you need to configure.
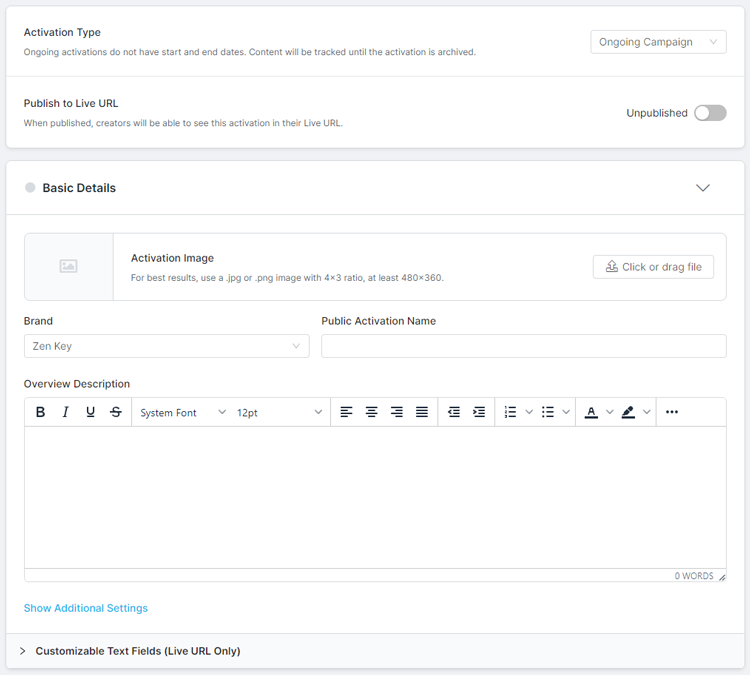
- Select Activation Type from the dropdown menu. There are two types:
- Ongoing Campaign: A campaign that does not have a start or end date. This option is selected by default.
- Scheduled Campaign: A campaign where you set the start and end date for content. If you choose a scheduled campaign, you’ll also need to set:
- Proposal Submission Dates (optional): The start and end dates for when creators can respond to your proposal.
- Content Tracking Dates: The start and end dates for when you track content for your Activation. Your Activation will end automatically on the end date you provide. If you have the Tracking & Deliverables module enabled, these dates are required.

- Select the slider in Publish to Live URL to publish or unpublish your Activation to creators’ Live URLs. By default, newly created Activations are unpublished and won't appear on creators' Live URLs.
To complete the Basic Details module, complete the following fields:
- Activation Image: An optional image for your Activation in GRIN.
- Brand: The Brand that you’re assigning the Activation to.
- Public Activation Name: The name of your Activation. This name is how the Activation will appear on your creators’ Live URLs and on the GRIN platform if you do not have a separate internal Activation name. This field is required.
- Overview Description: A high-level description of your Activation.
You can also enable Smart Actions for the Activation. Smart Actions are automatic events that can help run your program. Just toggle on any action you want to use for the Activation. They are:
- Notify creator when proposal has been accepted: After you accept a proposal and activate a creator, GRIN will automatically send an email to that creator to let them know they can start participating in the Activation. When you enable this, you also need to provide an email template GRIN can use to send the email.
- Notify creator when proposal has been rejected: After you reject a proposal, GRIN will automatically send an email to that creator letting them know their proposal was rejected. When you enable this, you also need to provide an email template GRIN can use to send the email.
If desired, select Show Additional Settings at the bottom of the module to customize internal settings for your Activation. These settings are:
- Internal Activation Name: An alternate name for your Activation that will only appear in the GRIN platform. Your creators will still only see your Public Activation Name on their Live URLs.
- Team: Assign your Activation to a Team you have in GRIN so only they can view and edit the Activation. If you do not assign a Team, all your GRIN users will be able to edit the Activation.
- Total Budget: Assign a total budget for your Activation that you can view from your Activation’s Reporting tab. The currency is automatically assigned based on your Brand’s chosen currency.
If desired, select Customizable Text Fields (Live URL Only) at the bottom of the module to customize how some of your Activation’s basic details appear in your creators’ Live URLs. These fields are filled in by default, but you can change them to fit your needs. The fields are:
- Overview Description Title: The title that appears above the Activation’s overview description.
- Get Started Button Text: The text that appears on the button to start the creator’s proposal form.
- Join Campaign By Title: The header text prefacing your campaign dates. This field will only appear in your creators’ Live URLs if you set Proposal Submission Dates for the Activation.
- Deliver Content By Title: The header text prefacing your tasks’ delivery dates. This field will only appear in your creators’ Live URLs if you set Content Tracking Dates for the Activation.
- Proposal Submitted Title: The title of the message that appears after creators submit their proposal.
- Proposal Submitted Message: The message that appears after creators successfully submit their proposal.
That's it for the basic settings! The following sections will go over setting up each optional module in detail.
Configuring Tracking & Deliverables
The Tracking & Deliverables module is where you'll set up any tasks and deliverables you want your creators to complete. You can also add #tags or @mentions you want to track and for creators to add to their posts. If you don't want to create specific tasks, you can also set up social network #tags and @mentions tracking in this module.
![]()
To complete this module, fill in the following fields:
- Do you need to create tasks?: Sets if you want to generate specific tasks for your creators as part of the Activation.
- If you select Yes, the Tasks window will appear.
.png)
- You must create at least one task to complete setting up this module. To do so:
- Select + Add Task to open the New Task module.
- Provide the following fields:
- Task Name: The name of the task. This field is required.
- Task Type: The type of content you want creators to produce for the task. This field is required. If you choose an Instagram Story task, you will also need to set if you’ll require your creators to connect their Facebook accounts as well.
- Number of Deliverables: The number of deliverables you want the creator to complete this task to consider it complete. If you always want to collect deliverables for this task, set the number to 0.
- Is this a required task?: Sets whether you’ll require this task to be completed by your creator
- Icon: Select an icon that will appear for your task on your creator's Live Site. This is only available if you chose a Custom Task task type.
- Delivery Method: Choose how creators will submit their completed deliverable. This is only available if you chose a Custom Task task type.
- Description: A description of the task.
- Content Approval: Enable an approval process for this task. This process means creators will need to manually submit their content to you to review before they post it on their social networks. Content Approval is not available for Custom Tasks. There are two parts to Content Approval:
- Require approval for this task before posting?: Sets whether to require approval for each deliverable in the task. You must set your Number of Deliverables to 1 or more to enable this option.
- Add caption approval to this task?: Sets whether to require approval for the post's caption in addition to the post's content. This will add an additional section for creators to submit their captions in the approval process. You must set Require approval for this task before posting? to Yes to enable this option.
- Select Add Task.
- If you select No, select the social networks you’d like to track content for from the What network(s) should we track? dropdown menu that appears. GRIN will track any hashtags or mentions you add to the Content Tracking Tags within the networks you choose.
- You must create at least one task to complete setting up this module. To do so:
![]()
- Content Tracking Tags: If you connected an Instagram account to the Activation's assigned Brand, then GRIN will automatically add the account’s @handle as a tracked mention. You can add more @mentions or #hashtags to track by entering them in Track additional accounts or hashtags. For each mention or hashtag, you can set the following:
- Show on creators’ Live Sites: Choose whether you want to display the mention or hashtag to creators on their Live Site proposals so they know to use it in their posts. If you do not display them, you will need to tell creators what mentions or tags to use yourself.
- Track in GRIN: Choose whether you want GRIN to automatically pull in content that has the mention or hashtag. If you select Yes, then every time a creator in the Activation posts content with that tag, GRIN will sync it to your Activation.
- Remove: Remove the mention or hashtag from your list.
If desired, select Customizable Text Fields (Live URL Only) at the bottom of the module to customize how some of the text fields appear in the Tasks step in your creators’ Live Sites. Most of these fields are filled in by default, but you can change them to fit your needs. The fields are:
- Tasks Title: The title that appears when your creators reach the Tasks step. This will only appear if you have created one or more tasks.
- Tracking Description: Describes how to complete a task. This will only appear if you have created one or more tasks.
- Instructions: Instructs how to write a post, including which tags or mentions to use.
- Connect Networks Description: The description describing what permissions you have when your creator connects their socials.
Configuring Products
The Products module is where you'll choose what products your creators will be able to choose from their Live URLs. These products are from products you've synced with a connected Ecommerce store or from products you've manually imported yourself. You can learn more about adding products to your Brand with our help articles found in Adding Products.
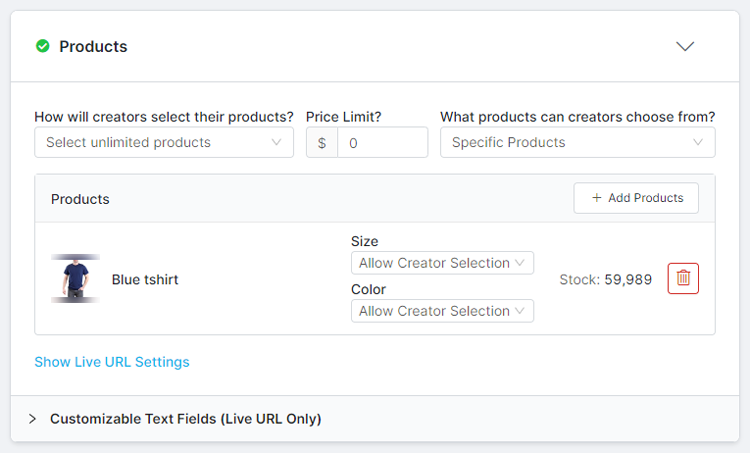
To complete this module, fill in the following fields:
- How will creators select their products?: Determines how your creators will select your products from your Ecommerce store. Each option has different fields:
- Select unlimited products: Allows your creators to choose any number of products from your selection. This option has the following required fields:
- Price Limit?: The product price limit you want to set for your creators. If you do not want to have a limit, set this to 0.
- What products can creators choose from?: Where you want your creators to choose your products from in your store. You can allow your creators to choose from all products in your store, only specific products, or only specific collections.
- Select up to a certain amount: Only allows your creators to choose a certain number of products from your store. This option has the following required fields:
- Price Limit?: The product price limit you want to set for your creators. If you do not want to have a limit, set this to 0.
- How many?: The limit on how many products your creators can choose from your store. This value must be set to at least 1.
- What products can creators choose from?: Where you want your creators to choose your products from in your store. You can allow your creators to choose from all products in your store, only specific products, or only specific collections. If you set How many? to 2 or more, you can also choose Restrict Selections, which lets you select a combination of products and collections you want to make available.
- Select from Website: Redirects creators to your Shopify store and lets them add each product to their proposal by its URL. This option is only available if you integrate with Shopify. It has the following fields:
- How many?: The limit on how many products your creators can choose from your store. This value must be set to at least 1.
- Price Limit?: The product price limit you want to set for your creators. If you do not want to have a limit, set this to 0.
- Receive preselected products: Lets you manually select what products to send to your creators. If you choose this option, you must also select the Products you want your creators to select from.
- Select unlimited products: Allows your creators to choose any number of products from your selection. This option has the following required fields:
If you chose Select unlimited products with Specific Products or Specific Collections, or Receive preselected products, the Products module will appear for you to add products for creators to select.

To select your products:
- Select + Add Products or + Add Collections, depending on your selection.
- Select the + button next to each product you want to include to add them.
- Select Add Products.
- If any of your products have variants (such as size or color), select what you want to make available to your creators. The selections are:
- Allow Creator Selection: Lets your creators choose their desired product variant.
- Product Variants: The remaining product variants you want to specify for the product.
If desired, select Show Live URL Settings at the bottom of the module to customize how your creators will interact with your products on their Live URLs. Select the checkbox next to each field to enable them. The available fields are:
- Show product prices: Displays the prices next to the products available. If you selected “No selection” for How will creators select their products?, this will be the only field available.
- Show product collections: Displays the product collections available, then the products within each collection. If this is unchecked, creators will see all individual products without being grouped in collections.
- Allow creator to submit multiple orders: Allows creators to submit multiple orders with the same limitations you’ve set for your products while the Activation is active. This means that if this option is enabled, your creator can, for example, submit an order for 2 products with a $100 limit, then submit a second order for another 2 products again with a $100 limit.
- Creator must complete tasks before submitting new orders: Requires your creators to complete their tasks before making a new order. You must check the “Allow creators to submit multiple orders” setting to enable this option.
If desired, select Customizable Text Fields (Live URL Only) at the bottom of the module to customize how some of the text fields appear in the Products step in your creators’ Live URLs. Most of these fields are filled in by default, but you can change them to fit your needs. The available fields are:
- Products Title: The title that appears when your creators reach the Products step.
- Products Description: The description that appears at the Products step.
- Out of Stock Message: The message that appears when all your products are out of stock.
- Shipping Information Description: The description that appears at the Shipping Information step.
Configuring Conversion Tracking
The Conversion Tracking module is where you'll select an affiliate link group, discount code group, or both to associate with your Activation. Once they're added, you'll be able to generate and assign personalized links or codes to creators you add to the Activation according to the link or code group's pattern. For more information on creating affiliate links, check out our article Creating Affiliate Link Groups. For more information on creating discount code groups, see our article How to Setup Discount Code Groups.
![]()
To complete this module, complete the following fields:
- Affiliate Link Group: Select the affiliate link group that you want to assign to your creators. Once you select one, you'll see additional options for managing the link in the Activation:
- Show on Live URL: Select this to display your creator’s link on their Live Site. If you don't select this, you'll need to manually send the affiliate link to creators in an email.
- Allow creators to generate new links: Select this option to let creators create their own affiliate links for your products from their Live Sites. The links they generate are considered child links and will still associate conversions with the original parent link you assign to them.
- Automatically assign parent links: Select this option to automatically generate and assign creators their unique affiliate links once you activate them. If you don't select this, you must manually generate a link for each creator later.
- Discount Code Group: Select the discount code group that you want to assign to your creators. Once you select one, you'll see additional options for managing the link in the Activation:
- Show on Live URL: Select this to display your creator’s discount code on their Live Site. If you don't select this, you'll need to manually send the code to the creators in an email.
If desired, select Edit Affiliate Link Groups or Edit Discount Code Groups to open your Brand’s Affiliate Links or Discount Codes in a new window. There, you can further edit and manage your link or code groups.
Configuring Payments
The Payments module is where you'll determine how your creators are paid. You can choose to pay them based on the payout rates in their assigned codes or links with Commissions, or you can choose to pay them flat amounts based on if they complete the Activation, per task type, or based on the creator's asking price with Contract Payments. You can also enable both options if needed.
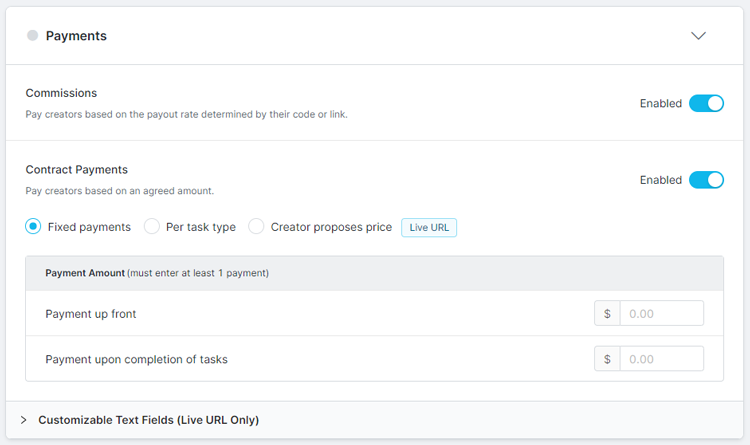
To complete this module, select the slider to enable the types of payments you'd like to use. The payment types are:
- Commissions: Pay your creators based on when their code or link is used. You must have the Conversion Tracking module enabled with either an affiliate link or discount code set to enable this.
- Contract Payments: Pay your creators a predetermined amount. Once enabled, you must select one of the following ways to pay contract payments:
- Fixed payments: Pay your creators a fixed amount for completing their tasks. You must provide an amount for at least one of these fields, but you can set an amount for both.
- Payment up front: The amount your creator will receive upon accepting your proposal.
- Payment upon completion of tasks: The amount your creator will receive upon completing their tasks.
- Per task type: Pay your creators a set price for individual tasks. You must have at least one task created in the Tracking & Deliverables setting for this option to be available.
- Creator proposes price: The creator how much they would like to be paid to complete your tasks or participate in your Activation. Creators will provide this price while completing your proposal on their Live URLs.
- Fixed payments: Pay your creators a fixed amount for completing their tasks. You must provide an amount for at least one of these fields, but you can set an amount for both.
If desired, select Customizable Text Fields (Live URL Only) at the bottom of the module to customize how some of the text fields appear in the Payments step in your creators’ Live URLs. Most of these fields are filled in by default, but you can change them to fit your needs. The fields are:
- Payment Title: The title that appears when your creators reach the Payments step. This only appears if you’ve enabled contract payments.
- Payment Description: The description that appears at the Payments step. This only appears if you’ve enabled contract payments.
- Commission Payments Description: The description that appears for commission payments. This only appears if you’ve enabled commission payments.
- Contract Payments Description: The description that appears for contract payments. This only appears if you’ve enabled contract payments.
Configuring Additional Information
The Additional Information module is where you can select Custom Properties you've created to survey creators for more information about themselves. For more information on creating Custom Properties, see our help article Managing Custom Properties.
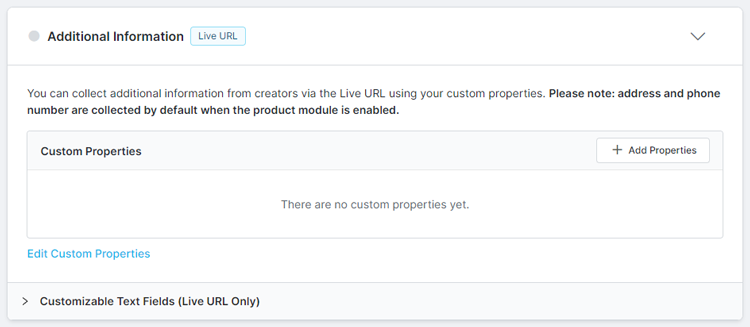
To complete this module:
- Select the + Add Properties button.
- Select a custom property from the dropdown menu.
- Select the checkbox next to the property if you want to require creators to answer it.
- If you want to add another custom property, select the + Add Properties button again.
- Repeat Steps 2-4 until you have as many custom properties as you need.
If desired, select Edit Custom Properties at the bottom of the module to open your creators’ Properties page in a new window, where you can further edit and manage your custom properties.
If desired, select Customizable Text Fields (Live URL Only) at the bottom of the module to customize how some of the text fields appear in the Other Information step in your creators’ Live URLs. These fields are filled in by default, but you can change them to fit your needs. The fields are:
- Additional Information Title: The title that appears when your creators reach the Other Information step.
- Additional Information Description: The description that appears at the Other Information step.
Configuring Brand Assets
The Brand Assets module is where you can include additional information on your Activation, including materials such as designs, briefs, or more.

Select or drag your files into the module to upload them. If desired, you can also select Customizable Text Fields (Live URL Only) to customize how some of the text fields appear in the Brand Assets step in your creators’ Live URLs. These fields are filled in by default, but you can change them to fit your needs. The fields are:
- Brand Assets Title: The title that appears when your creators reach the Brand Assets step.
- Brand Assets Description: The description that appears at the Brand Assets step.
Configuring Content Rights
The Content Rights module is where you can provide the content rights you'd like your creators to agree to on their live URLs.
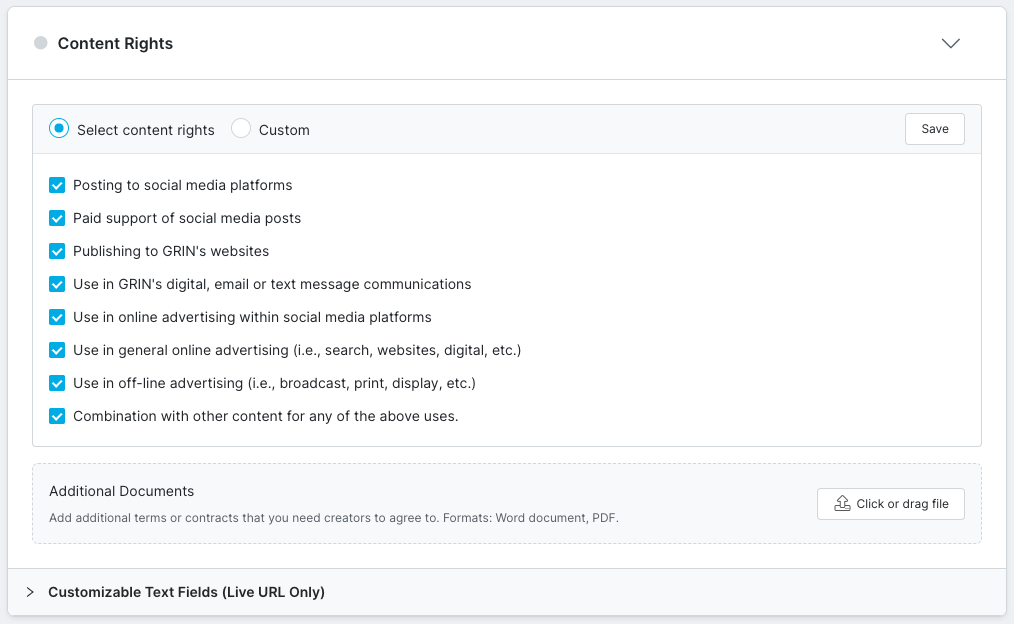
To configure this module:
- Select how you will compose your content rights:
- Select content rights: Checkmark the various rights that you'd like to include. Default content rights with your selections will appear to creators on their Live URL.
- Custom: Compose your own content rights that will appear to creators.
- Select Save.
- Select or drag any additional documents you want to include.
If desired, select Customizable Text Fields (Live URL Only) to customize how some of the text fields appear in the Content Rights step in your creators’ Live URLs. These fields are filled in by default, but you can change them to fit your needs. The fields are:
- Content Rights Title: The title that appears when creators reach the Content Rights step.
- Content Rights Description: The description that appears at the Content Rights step.
Configuring Paid Amplification
The Paid Amplification module is where you can set up your Activation to create Spark Ads from your creators’ TikTok content. For more information on Spark Ads, check out TikTok’s help article, Spark Ads.
To access this module, you need to have the following:
- A connection with GRIN’s TikTok for Business integration. For more information on how to connect, see our help article Integrating with TikTok for Business.
- The Brand you selected for the Basic Details module is set to the same one you used to integrate with TikTok for Business.
.png)
To complete this module, complete the following fields:
- Select an Advertiser: Select an advertiser from your TikTok Business account, which will be used to create and amplify Spark Ads. This passes the authorization code for a Spark Ad from the TikTok Creator Marketplace to your Ads Manager account.
- Authorization Period: Select for how long you want creators to grant permission to use their content and TikTok handle as part of the TikTok campaign. You will be able to amplify the content at any time within the period you selected to get your creator’s permission.
- Contact Name: The point of contact from your team for this TikTok campaign.
- Email: The email for the campaign’s contact.
Finalizing Your Activation
Now that you have all the settings you want for your Activation, you’re ready to create it! To do so:
- Select Save at the top of your Activation settings.
- Select the Go To Workroom button to view your Activation.
Congratulations! You now have a fully customized Activation for your brand. Now that you have all the tools to track, fulfill, and manage your Activation from start to finish, you’re ready to add your creators to your Activation!

