- 14 Jul 2023
- Print
- DarkLight
- PDF
Managing Your Delivered Content
- Updated on 14 Jul 2023
- Print
- DarkLight
- PDF
Content that your creators deliver as part of your Activation or content that you add manually will appear in the Delivered section in your Activation's Content tab. From here, you can view, manage, and save your creators' content and content metrics. You can also preview posted content with the post's caption, tags, mentions, and directly within this page.
What you'll need
- An existing activation with the following settings configured:
- Tracking & Deliverables: Enables the Content tab, and any content posted with your tracked tags or mentions will automatically be pulled into your Delivered section after your activated creators post. For more information on setting up an Activation, see our help article Creating an Activation.
- Activated creators
How to do it
To access your Delivered content, navigate to Program > Activations > Your Activation > Content > Delivered. This displays all the content your creators have delivered for your Activation as well as any manually added content you've added yourself. From here, you work with your creators’ content in a variety of ways. You can use the tools at the top of the table to filter and manage your content in bulk. You can also preview individual pieces of content, which displays various metrics, information, and actions for the post. You can learn more about these below.
General tools
At the top of your Delivered content section are various tools you can use to manage and filter your content library. These tools are:
.png)
- Pages: Select the arrows to navigate between pages of content
- Search: Enter keywords such as labels, hashtags, mentions, or captions to filter your content by
- Select All: Select to select all content on the current page
- Folders: Select to view and search your content folders. You can also create new folders or edit existing ones.
- Sort: Select to select a criteria to filter your content by. You can also choose to sort your results in ascending or descending order.
- Colors: Select to select a color to filter your content by. GRIN will analyze each piece of content and display content where that color appears.
- Tags: Select to search and select tags to filter your content by. You can also select Manage Tags to create or edit tags. You can apply tags to your content individually or multiple at once by selecting content and using Bulk Actions.
- Annotated Labels: Select this button to search and select labels to filter your content by. These labels include custom ones you add to content as well as ones automatically generated by GRIN based on what's recognized in each piece of content.
- Dates: Select to select a posted date range to filter your content by
- Current Filters: Select to view your currently applied filters. You can clear individual filters or Clear All filters from here as well.
- More Filters: Select to display more filters you can apply. These include:
- Contact Owner: Filters content from creators assigned with the selected Owner
- Media Type: Filters content by either photo or video
- Network: Filters content by social network or by Other Uploads
- Activation: Filters content by available Activations
- Your Property: Filters content by a Custom Property. You can learn more about Custom Properties with our help article Managing Custom Properties.
- Bulk Actions: Select to display actions you can take after selecting one or more pieces of content. These actions will apply to all your selected content. They are:
- Add Tags: Select tags to apply to your selected content
- Add to Library: Select folders to add your selected content to
- Download: Download your selection as a ZIP file. Large downloads make take longer than smaller ones, but once the download starts, you can navigate away from the page or do other tasks as usual. You'll be notified when your download is complete.
- Sync Content: Sync your selection with an available cloud content tool. If you haven't connected with one yet, you can complete the setup through here as well.
- Clear Selection: Deselect your current selection
At the bottom of your library are:

- Lines per Page: Select the dropdown menu at the bottom left of the table to customize how many pieces of content appear per page
- Pages: Select the left and right arrows navigate between pages
- Scroll to top: Select the up arrow to scroll to the top of your Delivered page
Previewing content
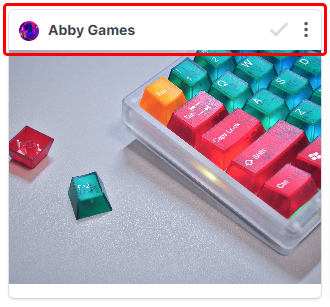
In addition to managing multiple pieces of content, you can also work with content at an individual level. One way is by using the actions available above each content's thumbnail. These are:

- Creator's Name: Select the creator's name to open a slideout with their social networks, engagement rates, and content previews
- Checkmark: Select to select that content. After selecting, you can apply bulk actions to it as described in General Tools.
- More Options: Select to display more actions you can take with that content. They are:
- Move Content: Select to move that content to either:
- Another task within the same Activation
- Another Activation that the creator is in. You can also move content to a specific task in that Activation.
- Download: Select to download a copy of that content onto your device. Note that you can only download non-embed content, so the following types of content cannot be downloaded:
- YouTube videos
- Twitch videos
- Twitter posts
- Label & Tags: Select to add or remove custom labels and tags to that content
- Remove: Select to remove that content from the Activation and your Content libraries
- Sync Content: Select to sync that content with an available cloud content tool. If you haven't connected with one yet, you can complete the setup through here as well.
- Approval History: If the content went through the Content Approval process, you can select this to display the approval history.
- Move Content: Select to move that content to either:
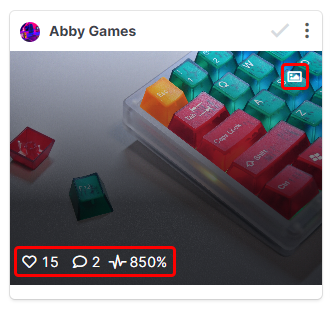
Another way to work with each content is with the thumbnail. Hover over a thumbnail to quickly see the post's metrics, such as views, engagements, likes, and comments, as well as the post's media type, such as an image or a video post.

You can also select the thumbnail to open a detailed content preview. This preview includes the post's caption, tags, and mentions, as well as detailed information about the post and additional actions you can take with that content. The information that appears in a preview are described below:
.png)
- Posted by and Date: Displays the creator who posted the content and when they posted it. You can Select either the creator’s name or the date to filter your Delivered content by the same creator or date.
- Content Association: Indicates if the content is associated with a program or not. Creator Content indicates that the content is part of an existing program, otherwise the content will be labeled as User Generated Content.
- Program: The program the content is associated with. Select on the program to filter content by that program.
- Caption: The caption the creator posted with the content
- Tags: Any tags the creator used on the content. Select on a tag to filter your content by that tag.
- Statistics: The number of views, likes, and comments on the content, as well as its engagement rate.
- Annotated Labels: GRIN’s automatically generated labels for the content, as well as any custom ones you add. Select on one to filter your content by that label.
- Primary Colors: The main colors GRIN detected in that content. Select on a color to filter your content by that color.
- Related Tasks: Any tasks the content is associated with
- Actions: At the bottom of the preview are various actions you can take to manage that piece of content. They are:
- Content Rights: View the content rights associated with that content
- Labels & Tags: Select to add or remove custom labels and tags to that content
- Download: Select to download a copy of that content onto your device. Note that you can only download non-embed content, so the following types of content cannot be downloaded:
- YouTube videos
- Twitch videos
- Twitter posts
- View: Select to view that content on the network where it was originally posted
- Sync Content: Select to sync that content with an available cloud content tool. If you haven't connected with one yet, you can complete the setup through here as well.
You can also use the arrows that appear next to the preview to navigate between content previews.
Amplifying content
If you set up your Activation with Paid Amplification, any TikTok posts that can be amplified as a Spark Ad will appear with a Boost Post button.
For more information on setting up Paid Amplification and amplifying content, check out our help article Amplifying TikTok Content.
![]()
To amplify a post, select the Boost Post button and complete the fields in the Boost Content modal.
.png)
After you select Start Boost, the Boost Post button will change statuses to keep you updated on the amplification process. The statuses are:
- Boost in Review: The content is currently being reviewed by TikTok before it’s created into a Spark Ad. TikTok reviews content to make sure it’s consistent with their Branded Content Policy and Community Guidelines.
- Boost in Progress: The content is currently amplified as a Spark Ad. Content can be amplified during the Authorization Period you chose while setting up Paid Amplification.
- Not Delivering: The content failed to amplify. This is usually because the content did not pass TikTok’s review. For more information on why content may be rejected and how to appeal, check out TikTok’s Ad Review FAQs.
Once the amplification period is over, the status will disappear from the content.
And that’s it! You now have all the tools you need to organize, manage, view, and download your activation’s content to suit your brand’s needs. You should now be able to work with all your content, multiple pieces of content at once, or individual pieces of content so you can effectively track your activation’s progress as well as save your creators’ content for future use by your brand!

