- 06 Sep 2024
- Print
- DarkLight
- PDF
Organizing Creator Content
- Updated on 06 Sep 2024
- Print
- DarkLight
- PDF
Creator Content pulls in content that creators post while participating in your GRIN programs, such as an Activation. You are able to browse posts, organize content into folders, and export content for your own use. You can also apply filters such as hashtags and mentions that were used in posts, annotated labels, and even colors within the content.
You also have the ability to save content into the Media Library. This allows you to keep posts you particularly like in a specific place in GRIN. This makes it easy for you to view all of your creator's content, as well as organize it all in one place.
Learn what you can do in Creator Content below.
What You'll Need
- Content Tracking Tags set up in your program, such as your Activation. Only content creators post on their social networks and with the hashtags or mentions you set as part of the program will appear in Creator Content.
- If you want to sync any content with a cloud content tool, you need to integrate your GRINaccount with one. You can learn how with our articles:
How to Do It
To view Creator Content, navigate to Content > Creator Content. This will open a page with individual pieces of content your creators have posted as part of your programs. You can use the general tools at the top of the page to filter and manage your content in bulk. You can also preview individual pieces of content, which displays various metrics, information, and actions for the post. You can learn more about these below.
General Tools
There are tools at the top of your page that you can use to manage and filter your content in bulk. These are:
.png) Available filtering tools for your content.
Available filtering tools for your content.- Search: Enter keywords such as labels, hashtags, mentions, or captions to filter your content by.
- Select All: Select all content.
- Folders: View and search your content folders. You can also create new folders or edit existing ones.
- Sort: Select criteria to sort your content by.
- Colors: Select a color to filter your content by. GRIN will analyze each piece of content and display content where that color appears.
- Tags: Search and select tags to filter your content by. You can also select Manage Tags to create or edit tags. You can apply tags to your content individually or multiple at once by selecting content and using Bulk Actions.
- Annotated Labels: Search and select labels to filter your content by. These labels include custom ones you add to content as well as ones automatically generated by GRIN based on what's recognized in each piece of content.
- Dates: Select a posted date range to filter your content by.
- More Filters: Display more filters you can apply. These include:
- Contact Owner: Filters content from creators assigned with the selected Owner.
- Media Type: Filters content by either photo or video.
- Network: Filters content by social network or by Other Uploads.
- Activation: Filters content by available Activations.
- Your Property: Filters content by a Custom Property. You can learn more about Custom Properties with our help article Creating Custom Properties.
- Current Filters: View and clear any filters you have applied.
- Bulk Actions: Display actions you can take after selecting one or more pieces of content. These actions will apply to all your selected content. They are:
- Add Tags: Select tags to apply to your selected content.
- Add to Library: Select folders to add your selected content to.
- Download: Download your selection as a ZIP file. Large downloads may take longer than smaller ones, but once the download starts, you can navigate away from the page or do other tasks as usual. You'll be notified when your download is complete.
- Sync Content: Sync your selection with an available cloud content tool, such as Dropbox or Google Drive. If you haven't connected with one yet, you can integrate with one through here as well.
- Clear Selection: Deselect your current selection.
Previewing Content
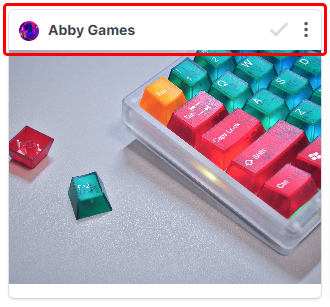
In addition to filtering and managing multiple pieces of content, you can also work with content at an individual level. One way is by using the actions available above each content's thumbnail. These are:
 Manage content at an individual level.
- Creator's Name: Select the creator's name to open a panel with their social networks, engagement rates, and content previews
- Checkmark: Select that content and apply bulk actions as described in General Tools.
- More Options: Select to display more actions you can take with that content. They are:
- Move Content: Select to move that content to either:
- Another task within the same Activation.
- Another Activation that the creator is in. You can also move content to a specific task in that Activation.
- Download: Select to download a copy of that content onto your device. Note that you can only download non-embed content, so the following types of content cannot be downloaded:
- YouTube videos
- Twitch videos
- Twitter posts
- Label & Tags: Select to add or remove custom labels and tags to that content.
- Remove: Select to remove that content from the Activation and your Content libraries.
- Sync Content: Select to sync that content with an available cloud content tool. If you haven't connected with one yet, you can complete the setup through here as well.
- Approval History: If the content went through the Content Approval process, you can select this to display the approval history.
- Move Content: Select to move that content to either:
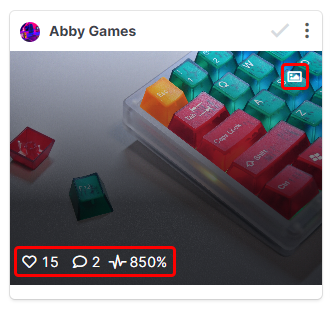
Another way to work with each content is with the thumbnail. Hover over a thumbnail to quickly see the post's metrics, such as views, engagements, likes, and comments, as well as the post's media type, such as an image or a video post.
 Hover over content to view its metrics.
You can also select the thumbnail to open a detailed content preview. This preview includes the post's caption, tags, and mentions, as well as detailed information about the post and additional actions you can take with that content. The information that appears in a preview is described below:
.png) View detailed information about content in its content preview.
View detailed information about content in its content preview.- Posted by and Date: Displays the creator who posted the content and when they posted it. You can select either the creator’s name or the date to filter your Delivered content by the same creator or date.
- Content Association: Indicates if the content is associated with a program or not. Creator Content indicates that the content is part of an existing program, otherwise, the content will be labeled as User Generated Content.
- Program: The program the content is associated with. Select the program to filter content by that program.
- Caption: The caption the creator posted with the content.
- Tags: Any tags the creator used with the content. Select a tag to filter your content by that tag.
- Statistics: The number of views, likes, and comments on the content, as well as its engagement rate.
- Annotated Labels: GRIN's automatically generated labels for the content, as well as any custom ones you add. Select one to filter your content by that label.
- Primary Colors: The main colors GRIN detected in the content. Select one to filter your content by that color.
- Related Tasks: Any tasks from the associated program the content is for.
- Actions: At the bottom of the preview are various actions you can take to manage that piece of content. They are:
- Content Rights: Select to view the content rights associated with that content.
- Labels & Tags: Select to add or remove custom labels and tags to that content.
- Download: Select to download a copy of that content onto your device. Note that you can only download non-embedded content, so the following types of content cannot be downloaded:
- YouTube videos
- Twitch videos
- Twitter posts
- View: Select to view that content on the network where it was originally posted.
- Sync Content: Sync your selection with an available cloud content tool, such as Dropbox or Google Drive. If you haven't connected with one yet, you can integrate with one through here as well.
You can also use the arrows that appear next to the preview to navigate between content previews, and select anywhere outside the preview to close it.

