- 30 Aug 2024
- Print
- DarkLight
- PDF
Submitting Content for Approval
- Updated on 30 Aug 2024
- Print
- DarkLight
- PDF
Your brand sometimes may require you to get your content approved before posting it, which means you’ll need to upload it to the Live Site. Once your content is ready, you can submit it for approval to your brand via your program proposal. Then, your brand will be notified that your content is ready for their review.
What You'll Need
- A Live Site. If you don’t have a Live Site, contact the brand you’re working so they can send you a link to it.
- An accepted proposal with tasks requiring approval. Submitting a proposal means you’ve accepted the brand’s requirements and are officially part of a program. For more information, see our help article Submitting a Proposal.
- The content you’re submitting ready for file upload. You should not post your content on your social media until after it's approved by the brand.
How to Do It
- Navigate to your Live Site.
- Press View on the program you’re submitting content for. This will open your proposal.
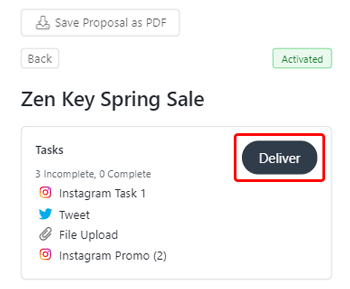
- In the Tasks module, select Deliver.

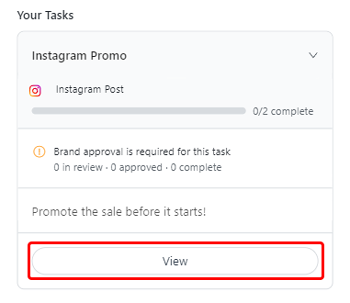
- Select View on the task you need to submit content for. Content that requires approval will be labeled.

- If the task has two or more deliverables, select which deliverable you're submitting content for approval. Otherwise, skip to Step 6.
- Select Upload File to upload your post.Each file has a 500 MB limit. If the brand wants to approve your caption (which includes your post’s description, hashtags, or mentions), enter that as well.
- Select Submit for Approval. This will let the brand know that your content is ready for them to review.
Once your brand has reviewed your content, you’ll get an email notification at the address you provided in your Live Site Settings. Be sure to have your preferred email set! For more information on updating your settings, see our help article Managing Settings.
You can always return to the deliverable's page to view your approval status, view your submission history by pressing View History, and view your most recent submission. Once your brand reviews your content, you'll see a new status, either Needs Changes or Approved, on your submission.
.png)
- After your brand has reviewed your content, return to your task using Steps 2-5 and view your submission. Depending on its status, you’ll need to do different things:
- If it’s marked Needs Changes, revise your content according to your brand’s feedback, then select Edit Upload and repeat Steps 6-7.
- If it’s marked Approved, your brand is happy with your content, and the approval process is complete.
That’s it! Your content has been approved for posting by your brand. Be sure to check if there’s an agreed-upon post date. Otherwise, you can post your content whenever you’re ready.

