Managing Tags
- 19 Aug 2024
- Print
- DarkLight
- PDF
Managing Tags
- Updated on 19 Aug 2024
- Print
- DarkLight
- PDF
Article summary
Did you find this summary helpful?
Thank you for your feedback
You can create custom tags to label your creators with. This can help organize and manage your creators as needed for your GRIN account.
How to Do It
You can access your tags from either your Contacts > Creators settings or your Contacts > Prospects settings. This article will use the Creators table to explain the process of managing tags, but the steps to create and manage them are the same from both Contacts pages.

Creating Tags
- From the Tags page, select Create.
- Enter the name of your tag and select Save.
Your tag will now appear in your Tags page.
Organizing Tags
You can view all your existing tags and how many creators have been assigned each tag from the Tags page. For each tag, you can:
- Edit: Update the name of the tag. This will also update the tag for any creator that's already been assigned this tag.
- Delete: Remove the tag.
Changing Tags for Creators
- Return to your Contacts > Creators or Contacts > Prospects.
- Select one or more creators with the checkbox.
- In the actions that appear, select Tags.
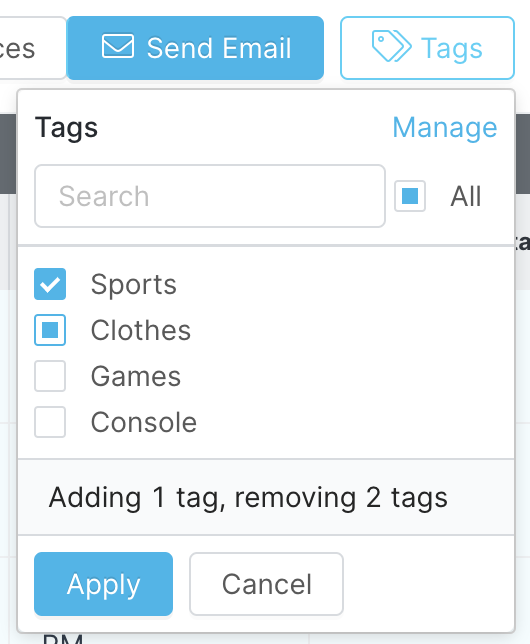
- Manage your tags for the selected creators by selecting the box next to each tag. Tags will be updated for every creator to match your selection. Tags are applied with the following logic:
- Checked: The tag will be added to every creator that doesn't have the tag yet.
- Box: This tag won't be changed for any creator.
- Unchecked: This tag will be removed for every creator that has it.
 Manage tags from the popover.
- Select Apply.
Was this article helpful?

