- 05 Mar 2025
- Print
- DarkLight
- PDF
Setting Up Payouts as a U.S. Resident
- Updated on 05 Mar 2025
- Print
- DarkLight
- PDF
In order to receive payouts from the brands you work with, you must submit your Payout information on your Live Site. This information includes:
- Your payout method, which must be a PayPal account
- If your brand is paying you through GRIN, a valid tax form, which is a W-9 for U.S. residents (if you're a non-U.S. resident, see Setting up Payouts as a non-U.S. resident). For more information on W-9s, check out this article from the U.S.’ Internal Revenue Service (IRS).
A W-9 is considered valid if all the information you provide, such as your name, address, and taxpayer identification number (such as an SSN or an FTIN), matches whatever is on file for you at the IRS or relevant tax agency where you originally created your tax information. If any of the information comes back as incorrect, GRIN will send you an email notifying you that your tax form is invalid. If that happens, you will have 30 days from when you receive the email to correct your information, otherwise you may be subject to backup tax withholdings by the IRS on your earnings. See Yearly income tax forms FAQ for more information on why your tax form may be invalid.
You’ll need to have a PayPal account already set up before adding it as a payout method, but you can complete a W-9 directly through your Live Site. Once you set up both of these items, you’ll be able to receive payments from the brands you work with. Depending on if you elect to withhold your taxes, you may also receive 1099 tax forms at the beginning of each year, which will cover your payouts from the previous calendar year. For more on 1099s, see our article Yearly income tax forms FAQ.
If you don't connect your PayPal account on your Live Site and submit a tax form, any payments your brand makes to you through GRIN will be refunded within 30 days. Be sure to set up your payout information as soon as possible so you can start receiving payouts for your collaborations with brands!
What you'll need
- A verified Live Site account. To learn more, see Verifying your account.
- An existing PayPal account. Your payments will be sent to that PayPal account. Currently, you can only receive payments through PayPal.
How to do it
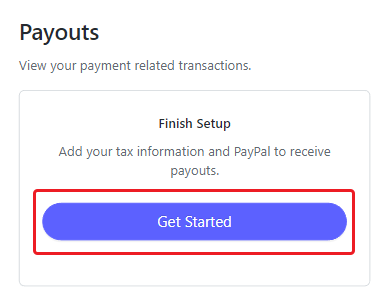
- Navigate to your Live Site > Payouts.
- Select Get Started under Finish Setup.
- Select your country. This should be the country that you file your taxes in. Then, select Set up Tax Information.

- On the "You're almost finished!" screen, select Continue.
- Select + Add Payout Method.
.png)
- Fill in your General Information, then select Next at the bottom of the page.
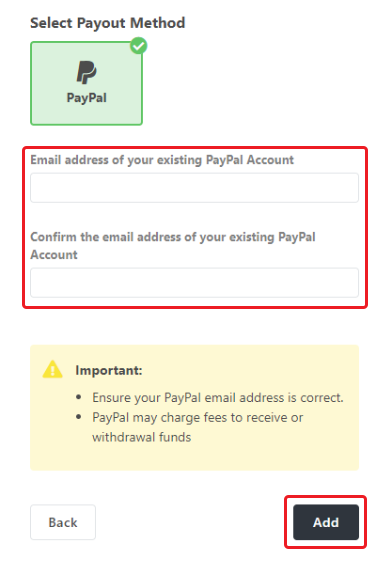
- Enter and confirm your PayPal email address. This address should be the one you use with your preferred PayPal account. Then select Add.
- Select Submit a Tax Form.
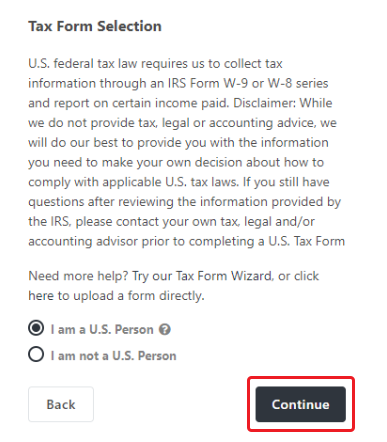
- Select I am a U.S. Person, then select Continue.
- Fill in your Personal Information.
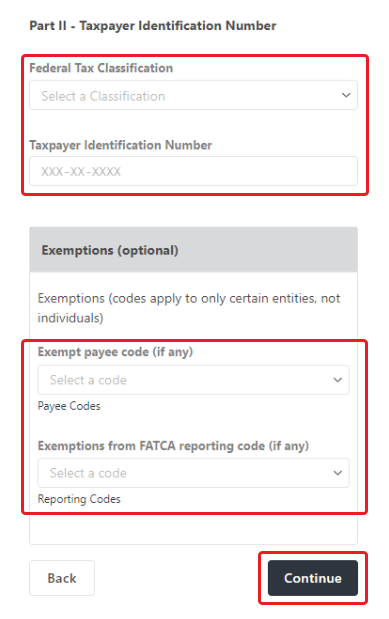
- In Part II - Taxpayer Identification Number, complete the following:
- Select a Federal Tax Classification. Depending on what you select, you may receive 1099 tax forms at the beginning of the calendar year. For more information, see our article Yearly income tax forms FAQ.
- Enter a taxpayer identification number (TIN). Depending on what you chose in the previous step, this might be your social security number, tax identifier type, or employer identification number. Be sure to submit the correct number! If you don't, you may be subject to tax withholdings. See Yearly income tax forms FAQ for more information.
- Open Exemptions (optional) and add exemptions if you need them.
- Select Continue and confirm all your information that appears is correct.
- In Part II - Certification, select the checkboxes next to all the statements and enter your name. Then select Complete W-9.
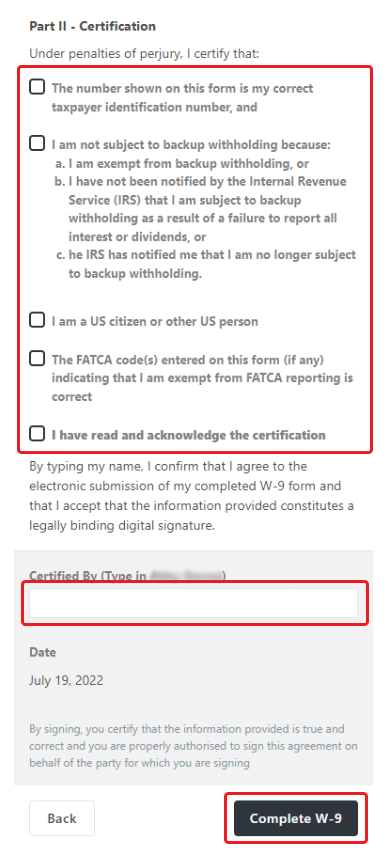
- Select Submit Form on the Submitting W-9 popup to confirm your submission.
- Choose how you'd like to receive your tax statements:
- E-Delivery: Your tax statements will be emailed to you at the address provided in your Live Site > Settings.
- Postal Mail: Your tax statements will be mailed to you at the address provided in your Live Site > Settings.
- Select Continue at the bottom of the page.
That's it! Your payout and tax information have been submitted successfully. Any withholdings selected in your tax forms will be documented in your payment emails going forward. Now, you're ready to receive payouts from your brand!

